Showing posts with label Gifts from the Kitchen. Show all posts

Thursday, August 14, 2014

Fresh Peach Preserves


I don't can often, but when I do.......I love to make these Fresh Peach Preserves.  So good.  And really easy.  I got this recipe back in maybe 1994 from a good friend who shared it with me when I had a 1/2 bushel box of peaches and needed to do something with them--like right then.  Since then, if I ever have the good fortune to have some totally sweet awesome peaches in bulk, this is my go-to recipe. I don't even bother freezing any.


Ingredients:
5 cups well mashed peaches
1 cup crushed pineapple (with juice)
10-15 chopped Maraschino cherries
1 tsp. Fruit Fresh
2 pkgs. Sure-Gel
1 tbsp. lemon juice
1/2 t. butter
5 cups sugar

1.  Combine first 6 ingredients in a large saucepan.  Add the butter and bring to a full rolling boil, stirring constantly.

2.  Add sugar quickly.  Return to full boil and boil for 5 minutes, stirring constantly.

3.  Immediately fill CLEAN jars and put lids and rings on.  Hand-tighten rings.*

4.  Invert jars for 5 minutes, then return to normal position.

5.  Have fun hearing the lids POP as they seal at random moments.

6.  Give out to your "framily". Keep some for yourself.


YIELD--about 10 1/2-pint jars. 


Source:  Pat Sorenson via Tonya Shepherd Sorenson.


*  If you have never canned  before, be sure to check out instructions on Google or go to the Ball Canning website for tutorials.

Monday, December 16, 2013

How To Make Melissa's Yummy Cinnamon Rolls - Photo Tutorial

I originally posted this on my own blog, but wanted to share it here also since so many people are enjoying this recipe! Perfect for Christmas morning, or to take to Christmas parties! I promise they are easy to make, and they are sooooo delicious! 

Cinnamon Rolls

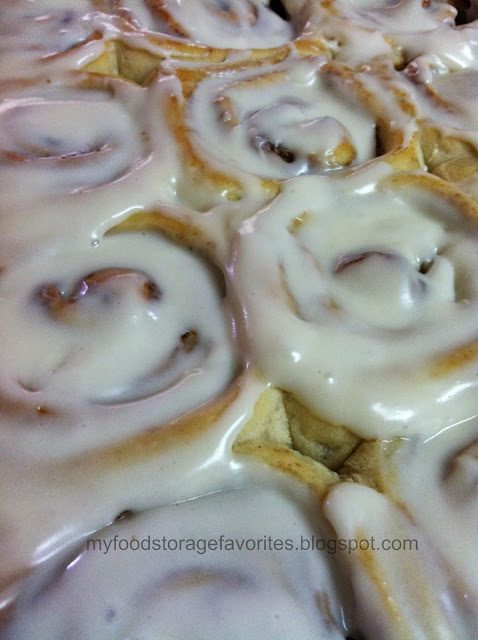
(I know this picture is obnoxiously large, but I wanted you to be able to get up close and personal with these cinnamon rolls. ha! ha!)


1. Start with the 30 Minute Roll Recipe
Note: This recipe makes about 50 cinnamon rolls! You might want to half the recipe!

Mix and rest 10 minutes:
3 ½ cups warm water                          
¾ cup sugar (OR 1/2 cup honey)
1 cup oil                                                
6 TBSP Yeast (Less yeast may be used, but rising time will be longer)

Add:
1 TBSP Salt                                          
3 eggs (can use egg powder and water)
10 ½ cups flour (wheat flour turns out really light and fluffy)

Mix in mixer or knead. Shape into rolls. Raise 10 minutes. *Bake at 425° for 10-12 minutes or until done. 

2. Here’s How to “Shape into Rolls”
Cut dough in half. Roll out one of the sections into a rectangle about ¼ inch thick (or so!) Spread soft or melted butter over the dough. Spread a mixture of brown sugar and cinnamon over the butter. (I use about 4 cups of brown sugar to 3-4 TBSP of cinnamon. I go heavy on the cinnamon and never really measure. I just dump it in until it taste the way I want it to.) Roll up. Cut into 1 inch sections and place on cookie sheet. Let rise for about 10 minutes or so. Repeat with other section of dough, or just make them into dinner rolls.

*I prefer to bake them at 375 degrees until they are starting to lightly brown and dough is done in the middle. Take out of oven and let cool for about 5 minutes or so. Spread on or drizzle on the frosting.


Photo Tutorial:


Start off by shaping the dough roughly into a rectangle.
Cinnamon Rolls

Roll out the dough about 1/4" thick. This will take practice.
Roll out dough

Spread soft or melted butter over dough. 
Spread on the Butter

Put cinnamon sugar on the dough.
Cinnamon Sugar

Spread it out smoothly - feel free to use your hands.
Spread out Cinnamon Sugar

Roll up the dough.
Roll up the dough

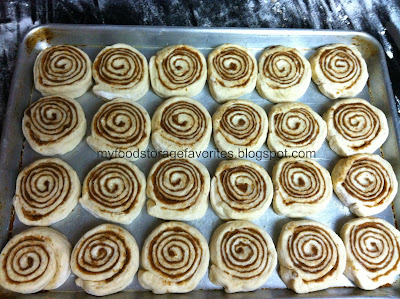
Cut into 1 inch slices.
Cut the dough

Place them neatly on a cookie sheet and let them rise. This is a "jelly roll pan", which is half of a sheet cake. You can put them on smaller pans that just hold 12 cinnamon rolls.
Let them rise

Bake them in the oven and look how beautiful they are!
Bake in oven

Oh. My. Yumminess!
The best cinnamon rolls

Spread on your cream cheese frosting. (Recipe below)
Spread on Frosting

I wish you could smell these and taste them! Make some! YUM!!!! 
The best cinnamon rolls


3. Here’s How to Make the Frosting
Okay, I have to admit that I never measure! But here is an estimate….Soften about 8 oz of cream cheese and 3 tablespoon of butter in a large plastic bowl. Add 3-4 cups powdered sugar, 1 teaspoon of vanilla extract, and a few (maybe 4??) tablespoons of milk. Mix with hand mixer…you may need to add more milk or powdered sugar to get the right consistency you like. I like it kinda thin like a cake batter, not thick like cake icing.

4. Enjoy!

Eat immediately with a glass of milk and enjoy! They are good for a few days, but you will want to warm them up for about 8 seconds in the microwave!

Friday, November 22, 2013

Banana Bread


I am back...I have been so sick but am finally feeling better.  It feels good to cook again.  This is my favorite Banana Bread recipe.  It is moist, cuts without crumbling, and has the yummiest crust (as shown in the picture).  Enjoy!

6 ripe mashed bananas
3 1/2 c. sugar
4 beaten eggs
1 c. oil
1/2 c. sour cream
2 t. vanilla

Mix above ingredients together well.  In another bowl mix together the following ingredients:

4 c. flour
1 1/2 t. salt
2 1/2 t. soda

Mix together the dry and wet ingredients and pour into 3 greased regular size loaf pans.  Bake at 325 for 1 hour.

Source: Katie Palmer

Tuesday, October 15, 2013

Snickerdoodle Brownies

 
So, you should know, that unless you are prepared to pretty much eat the whole pan of these you might not want to make this recipe! You think I'm kidding!? These have the perfect texture, a little chewy and just the right amount of sweet. This is definitely going down as a family favorite! I did find this recipe on "pin-interest". (That's how my mom pronounces it. LOL!) This is a great fall dessert. The cinnamon and sugar are warm and cozy.
 
Recipe:
 2 2/3 cups all-purpose flour
2 teaspoons baking powder
1 teaspoon salt
2 cups packed brown sugar
1 cup butter, at room temperature
2 eggs, at room temperature
1 Tablespoon vanilla
2 Tablespoons white sugar
2 teaspoons ground cinnamon

Preheat oven to 350 degrees. Lightly grease a 9 x 13 inch baking pan.
Get out three separate bowls.
1-In a medium bowl, whisk together the flour, baking powder, salt and set that aside.
2-In  small bowl combine the white sugar and cinnamon, and set that aside.
3- n a large bowl, mix together the butter, brown sugar, eggs and vanilla until smooth. Add the flour mixture to the egg mixture and beat until well blended.
Spread the mixture into the 9x13 baking dish.
Sprinkle the sugar cinnamon mixture evenly over the batter.
Bake for 25-30 minute or until it springs back at touch.
Let the brownies cool on a wire rack for a bit and serve.
 
 
original recipe from Dozen Flours


Wednesday, October 9, 2013

Buttercup Yeast Bread


This is another recipe I wanted to slide in before squash season is over. I had a subscription to Taste of Home magazine for a few years and this is one of my favorite finds from the magazine. You can use any type of hard squash. I have used butternut, acorn, and sweet mama, all with good results. The squash just gives the bread a lovely golden color and  a hint of sweetness. Everyone loves this recipe!

Buttercup Yeast Bread

Ingredients

  • 3 packages (1/4 ounce each) active dry yeast (about 2 3/4 tsp)
  • 1/2 cup warm water (110° to 115°)
  • 2 tablespoons sugar
  • 2-1/2 cups mashed cooked buttercup or butternut squash
  • 2 cups milk
  • 2/3 cup packed brown sugar
  • 2/3 cup butter, softened
  • 2 eggs, lightly beaten
  • 3 teaspoons salt
  • 13 cups all-purpose flour
Directions
  • In a very large bowl, dissolve yeast in warm water. Add sugar; let stand for 5 minutes. Add the squash, milk, brown sugar, butter, eggs and salt; mix well. Add 6 cups flour. Beat on medium speed for 3 minutes. Stir in enough remaining flour to form a soft dough.
  • Turn onto a floured surface; knead until smooth and elastic, about 10 minutes. Place in a greased bowl, turning once to grease top. Cover and let rise in a warm place until doubled, about 1-1/4 hours.
  • Punch dough down. Divide into three portions; shape into loaves. Place in four greased 9-in. x 5-in. loaf pans. Cover and let rise until doubled, about 45 minutes.
  • Bake at 350° for 35-40 minutes or until golden brown. Cool for 10 minutes before removing from pans to wire racks to cool completely. Yield: 4 loaves (16 slices each).
 

Monday, September 23, 2013

Easy French Bread

 If you have never made bread before, this is a perfect place to start! This is such an easy, delicious bread! And really it's hard to mess it up! It makes fabulous garlic bread, French toast, delicious sandwiches and bread bowls! It will be a family favorite!


Easy French Bread

Ingredients:

2 TBSP yeast     
5 TBSP oil
2 ½ cups warm water                      
1 TBSP salt                           
2 TBSP sugar                                       
6 cups white flour 

Directions:

1. Mix all ingredients together and knead in a mixer (like a Bosch or Kitchen Aid) for 10 minutes. You can do it by hand with a bowl and spoon, but just add half of the flour at first and stir for a while until the "batter" seems smooth. Then add in more flour and mix until it gets too difficult to stir by spoon. Dump it out onto a floured surface and knead in the remaining of the flour. I actually do not ever exactly measure the flour. I know I have enough flour when the dough is no longer really sticky, but be careful to not add too much. You do not want the dough to be stiff or dry. A little less flour is better than too much!

2. Let the dough rise in the bowl until doubled. Punch down. (I usually cover the dough with a damp kitchen towel to keep it from drying out.)

3. Divide and form into 2 french loaves. (Or you can braid it!) Cut top of loaves three times with a serrated knife. You can also brush with beaten egg white and sprinkle with sesame seeds.  

4. Let rise until double - 30 mins or so. Bake for 20 to 30 minutes at 400 °. (Shorter for a soft crust, longer for a thick and chewy crust.)  

Notes: 

*You can also put balls of this dough on a cookie sheet to make “Bread Bowls”. Once baked, cut out center of round loaf and  pour in a creamy soup. Make the Bread Bowls any size you want.
*People love to receive this as a gift, especially the braided bread below!

Here is how I form the loaves:

Then put it on a baking sheet and cut the top of the loaf, and let it rise.

If you want to braid it, divide one half of the dough into 3 equal pieces, and roll out each piece with your hands into a long skinny "snake". Pinch the ends together, or start braiding it however you can. I often have to rebraid it because I get messed up a bit, like in the picture below. I eventually got it right. : ) Pinch the ends together and tuck them under and try to make it pretty. Even if it's not perfect, it will still look pretty and taste delicious!

 I forgot about my bread that morning while I was homeschooling my children, and I let it rise a little too much. It got huge, but it was still gorgeous and delicious! You can spread a little butter on the top of the hot loaves when it comes out of the oven. ENJOY!!!

Monday, July 29, 2013

Homemade Playdough


I love this recipe! It makes the BEST playdough! And it's is safe for little ones, has a nice texture to play with, and it comes out of clothes and carpet with just a moist rag. Such a fun, cheap easy activity for kids! 


Homemade Playdough

Ingredients:
1 cup all purpose flour
2 tsp cream of tartar
1 cup water
1/2 cup salt
1 TBSP oil
food coloring (I have used liquid drops and gel. Either one works great!)

Directions:
1. Mix flour, cream of tartar and salt together in a saucepot (no heat yet!). Add water, oil and food coloring. 

2. Stir mixture together. Make sure you have the right amount of food coloring so that it is the color you want. This is the only chance you have to add more coloring!

3. Turn heat on high and stir constantly until it forms a ball. This happens really fast! 

4. As soon as it has formed a ball and most of the wetness is gone, dump playdough onto a counter or cutting board. Let cool for a few minutes, and knead to until smooth. If you overcook it, the dough will be a little dry. I like to take it off the heat with a little wetness still showing in the dough, and then knead it until smooth. (See picture and explanation below.)

5. Store in a plastic bag. Have fun! (I put it in a plastic bag while still warm, so it keeps the moisture and does not dry out.)

Note: I always make a double batch, or a few batches with different colors. One batch will not be quite enough to share happily with 2 or 3 children. More is better!

Source: Adapted from Cookin' With Home Storage by Vicki Tate


This is what it looks like as it starts forming a ball. See how it is still wet? At this stage, I would flip the dough over and let the wet part touch the hot pan and then take it out with just a few wet spots on the dough. Once you make your first batch, you'll understand how fast it forms a ball, and when to take it out of the pan! 

Monday, July 15, 2013

The Best Chocolate Chip Cookies Ever!

Forget about your diet! You have to try these! They will make you so happy! 


The Best Chocolate Chip Cookies Ever!

Cream together:
1 cup CRISCO shortening (Sometimes I use ½ cup shortening and ½ cup butter)
1 cup brown sugar
½ cup white sugar

Mix in:
1 tsp vanilla
2 eggs

Add:
2 ¼ cups white flour (you can use white wheat flour…it’s very good)
1 tsp baking soda
1 tsp salt
Chocolate chips (as many as you like!) I used "chunks." You can add chopped nuts too!

Put spoonfuls on a baking sheet and bake at 350 degrees until just barely starting to brown on the edges. They will look a bit underdone to the average person! Take out of oven and let them sit for a few minutes on the pan. (DO NOT over cook if you want them to be chewy and soft.) 

Pour a glass of milk and ENJOY!!!! YUM YUM!!!

Notes: 
1. One batch makes 2 dozen large cookies. Trust me, you'll want to make a double batch. 

2. These make fabulous M&M cookies too! You can add anything you like in these cookies! White chocolate chips and macadamia nuts, or dark chocolate and pecans...the possibilities are endless! 

Source: My amazing mom! (Brenda Joyner) She taught my sister and I how to make these when we were really young, and we were famous for our delicious cookies! 

Monday, March 11, 2013

Homemade Chicken Pot Pie


I was thinking of giving you a recipe for a diet soup that I love, but then I thought that everyone should know how to make a delicious homemade pot pie for those days that you need a little comfort food! The diet soup can wait for another day!

I make these in batches of 4 and freeze them, and then I have something quick to pull out of the oven for dinner on a busy day. My kids LOVE these! People ask me how many one will feed, and here is my answer: It will feed me 7-8 servings, but it will feed my son Curtis, who is 16, only 2 servings. It would definitely feed 4 really hungry normal people who are not teenage boys.  (smile).


Homemade Chicken Pot Pies

Ingredients:

4 frozen pie shells (or you can make homemade crust)
4 cups cooked, diced chicken
1 large can cream of chicken soup (or 2 small cans - about 20 oz)
1 8 oz package cream cheese, softened
1 1/2 cups baby carrots cut into slices
1 cup frozen peas
1/4 cup (or more) diced onions
4 cups potatoes, diced 
1 can of corn (or some frozen corn)
2 chicken bouillon cubes (or 1 if you like less salt)
2 boxes of roll out top crust (This will give you 4 top crusts) I recommend Pillsbury brand - or you can make homemade
1/2 cup flour and 1/2 cup water
1/2 tsp of Poultry Seasoning (or  a little Thyme, Oregano and Sage)
Salt and pepper to taste

Directions:

1. Put the diced potatoes, carrots and onions in a pot. Cover with water. Add the bouillon cube and some salt and pepper. Bring to a boil and cook until the potatoes are done...but not mushy and falling apart.

2. In a small bowl, add 1/2 cup flour to 1/2 cup of water and mix with a fork until smooth. Pour this slowly into boiling pot of vegetables while stirring briskly. This will thicken the water that the vegetables are cooking in. Turn off heat and let it cool down a bit.

3. In a large mixing bowl, beat the cream cheese until smooth with a hand mixer. Add in the cream of chicken soup and poultry seasoning. Mix until well blended. Add the chicken, corn, peas, and the cooked potato/carrot/onion mixture. Mix all ingredients together until well blended.

4. Add this delicious mixture to the pie shells, dividing mixture evenly between the 4 pie shells.

5. Roll out your crust onto the counter. (Cut a heart in the center for a vent hole if you would like - it's so cute!) Place the crust on top of the pie. Fold under the extra crust as neatly as possible around the edges. Then pinch the edge of the crust to seal. If you have no idea how to to that, look up a tutorial. It is so hard to explain in words. But it is easy to do, and everyone has their own way of making their crust edge pretty. 

6. If you did not cut a heart into the center of the crust, cut a few vent holes into the top crust. Just take a knife and make a few small cuts.

7. At this point, I put a square of wax paper on top of the pie, then cover with foil and put in the freezer. I suppose you could skip the wax paper if you don't have any.

8. If you want to bake one right away, bake it at 375 degrees for 30 - 45 minutes, depending on how dark you like your crust.

9. When baking from frozen, bake at 350 degrees for 1 hour and 15 minutes.

YOU ARE GOING TO LOVE THESE CHICKEN POT PIES!

Notes: 
1. Kids love to help make these! And they love eating them too!

2. These are perfect to have on hand when you need to take someone a dinner, or when you forgot to plan dinner for your own family.

3. We made these for a fund raiser at church to help earn money for girls camp. We sold LOTS of them and people liked them very much!

Source: Adapted from my friend Becky Robinson, Rock Hill, SC.


Tuesday, January 22, 2013

Sugary Peanut Butter Kisses

 
These are so yummy.  The kids enjoyed mixing the colors into the sugar, and then rolling the cookies in the different colored sugars.  So, this is a very kid friendly recipe and so good to eat!
 
Coloring sugar:
1-2 drops Wilton Gel Food Colors
1/2 c - 3/4 c Granulated sugar
 
Pour sugar into a ziploc bag and squeeze one drop of gel color into the sugar. Seal the bag and start squishing the color into the sugar unto all the sugar is colored.  You can darken the color  by adding more drops of the gel. You can lighten the color by adding more sugar.
 
 
Cookie Ingredients:
1/2 c. sugar
1/2 c. firmly packed brown sugar
1/2 c. real butter, softened
1/2 c. peanut butter
2 TBSP. milk
1 tsp. vanilla
1 egg
1- 3/4 c. self-rising flour
Hershey kisses, about 30 or more pieces, with the foil off
 
Preheat your oven to 375%. Cream together the white sugar, brown sugar and butter. Really give a few minutes to get nice and creamy. Scrape down the sides of your bowl and add the following peanut butter, milk, vanilla and egg. Mix well and scrape down the sides of your bowl. Whisk the flour and then scoop up the right amount needed.  Slowly add in the flour and continue to scrape down the sides of the mixing bowl.
 
Pour colored sugars onto paper plates. With a cookie scoop drop 1" balls of the dough into the different colors of sugar and roll around. Place the cookies about 2" apart on the cookie pan. Bake for 10 minutes for a soft chewy cookie, and 12 minutes for crunchy cookie.  (The cookie will flatten a bit as it bakes.)
 
Take cookies out of the oven and immediately press the hershey kiss into the cookie slightly! Move cookies to a rack to cool.  It takes a while for them to cool down because the hershey kiss melts a bit and then solidifies again.  So, give them time.  Then enjoy!


Thursday, January 10, 2013

Sticky Gooey Caramel Corn

We just got an air popcorn popper. You remember those? I hadn't seen one since I was a kid. We received one for Christmas and IT IS SO FUN! Delightful! It's the little things in life, you know?

I digress. The recipe, Kara. The recipe.

The name of this recipe is EASY. Quick and easy. Ignore the header. That's what it's name *should* be. And kiddos of all ages (even those of "Mature Years") will love it.

Ingredients:
2 bowls of popped popcorn (I use one scoop full of kernels)
1 C butter
2 C Brown Sugar
3/4 - 1 C Light Karo Syrup
Nuts (opt)

1. Melt the butter in a medium saucepan over medium heat.
2. Add the sugar and syrup. Stir constantly until it begins to bubble.
3. Boil for 1 min. (Continue stirring. You'd hate to burn it!)
4. Remove from heat and pour over the bowls of popcorn.
5. Stir carefully with a wooden spoon until all the popcorn is covered a fair amount. Add the nuts if you are using them.

Serve immediately--that's the way we like it! You can put it into balls if you wish. Just lay them on wax paper and let them cool.

Source: My long lost friend, Erika Johanson.

Tuesday, December 11, 2012

Christmas Peanut Butter Crackers


      CAUTION!  CAUTION!  CAUTION!!  CAUTION!!  CAUTION!!  CAUTION!!  CAUTION!!

These are just about good enough to make you slap your momma!   Ha-Ha-Ha! No, seriously, these things are scrumptious and addicting.  We make these every year as part of our Christmas Treats Extravaganza! Some families probably just call that night Christmas Eve.  But, we call it our Christmas Treats Extravaganza!  (It's fun to say. Use your biggest announcer's voice.  Try it.)  We make a ton of different kinds of goodies/ treats and we eat them for dinner, and then we have plenty for our company that comes to visit.   You should try these, and I promise your family will love them! They almost taste like Nutter butter cookies!

Ingredients:
Creamy Peanut Butter
Ritz crackers
Almond Bark Candy
Wax Paper

Lay out a long piece of wax paper.  Spread peanut butter on a Ritz cracker and sandwich it with another Ritz cracker.  Make these using 1 whole sleeve of crackers.  Once you get this far, set them aside and break your almond bark into squares. Place them into a microwavable bowl, and melt them in the microwave for about 60 seconds.  Take the bowl out of the microwave and try to stir the squares and break them up as much as you can.  Then put the bowl back in the microwave for about 15 seconds.  Then stir and break up lumps. You will do this over if needed until the candy is all melted and smooth.  Then put a Ritz cracker sandwich into the candy and flip it over with the fork covering as much of the sandwich as you can.  You have to work quickly because the hot candy melts the peanut butter!  Then as you pick up the Ritz cracker sandwich with a fork (kind of scoop it up. don't stab it with the tongs!) , you can tap the fork gently on the bowl to get off excess candy.  Then put the Ritz cracker onto the wax paper you have layed out.  Finish the entire sleeve of cracker sandwiches you have made. 

You can get about 1 & 1/2 sleeves of Ritz cracker peanut butter sandwiches dipped to one package of almond bark candy.