Friday, September 30, 2011

Make Ahead Mashed Potatoes


I LOVE mashed potatoes. This recipe is pretty much amazing in my book. I hope you enjoy!


5 pounds potatoes, washed, peeled and diced
2 Tbsp. Butter
8 oz. Cream cheese
8 oz. Sour cream
2 tsp. Garlic Salt
Chopped Chives, optional

Bring water to a boil and cook potatoes until tender. Place into mixer add butter, and mash potatoes. Add cream cheese, sour cream, and garlic salt. Beat until fluffy. Pour into greased 9x13 casserole dish top with chives if wanted. Cover with foil.

You can either place in the fridge - it'll stay great for up to 3 days or you can cook them right away.

Cook covered, at 350 for 30-45 minutes (based on if it's chilled or warm).

Thursday, September 29, 2011

Window Cleaner


Back in the 70's when I was at Ricks College (you know it as BYU-Idaho) I had to make a presentation in one of my classes.  This was videotaped so that we could see ourselves in action, teaching something.  Complete with a flip mirror above my head so that the camera and audience could get a better view of what I was doing, I demonstrated how to make homemade window cleaner.  That was a fun assignment and I, of course, aced it!  In another class we all contributed tips, articles, ideas, etc. to help build each other's Personal File.  That is where I got this "recipe" and no I do not remember who it came from.  I have used this cleaner, off and on, for years.

Ingredients:
2 tablespoons NON-sudsing ammonia
1 teaspoon liquid detergent
1 pint rubbing alcohol
1 gallon container
   water
   food coloring

1.  Add the first 3 ingredient to the gallon container, then fill with water. 
2.  Color to preference.

TIP--I would be careful with which color you choose.  Blue would be an obvious choice.  Pink or Purple might be too enticing for a little child who doesn't know better and wants to check out the pretty water...Mine is light purple but I don't have small ones at home, until the grandson comes over and then I just make sure he doesn't have access.

Wednesday, September 28, 2011

Beef and Bean Burger Wraps

These are so good and a great option for a healthy dinner! I can only give credit to family.go.com.

Ingredients:
1 lb. lean ground meat
1 1/2 cup refried beans
2 jalapenos, diced and without seeds
1 avacado, peeled and pitted
1 cup fresh salsa
5 tortillas
Shredded lettuce
Pepper jack cheese, shredded
Limes wedges

1. Preheat oven broiler. Place oven rack in upper third part of the oven. Line a pan with aluminum foil and coat with cooking spray.
2. Mix ground beef, beans and jalapenos just until combined. Do not over mix. Shape into five oblong patties.
3. Broil patties 12-15 minutes, turning once after about 7 minutes.
4. In a medium bowl, mash avacado and mix with salsa.
5. Spread guacamole on to tortillas. Sprinkle with lettuce and cheese. Top each with a burger, sprinkle lime juice from one wedge and wrap!

Source: family.go.com

Cheesy Vegetable Chowder


This is one of our favorites soups and taste great any time of year. It is especially delicious on those cool fall and winter days. I serve this with homemade bread and a crisp green salad - Yum!

Ingredients:

1/4 cup butter
1 medium-large onion diced
3 cups finely chopped cabbage
5 stalks celery chopped
1 tsp black pepper
1 TBLS garlic powder
2 cups water
1# carrots chopped
3 TBLS Chicken Soup Base
8 cups water
2 cups diced potatoes
3 cups milk
1/2 cup flour or cornstarch mixed in with 1 1/2 cups water
2 cups chopped cauliflower
2 cups chopped broccoli
1 1/2 cups shredded Sharp Cheddar Cheese
4 oz Velveeta Cheese cut into cubes


1. In large soup pot place butter and onions - stir until butter is part way melted.
2. Add cabbage, celery, black pepper and garlic powder - stirring occasionally until onions and cabbage are browning
3. Add 2 cups water, soup base, and carrots boil for about 5 minutes or until water is almost gone
4. Add 8 cups water and boil for 10 min - stirring occasionally
5. Add diced potatoes and milk - bring back to a boil and let boil for 5 min. Watch pot carefully as milk tends to boil over
5. Add flour and water mixture stirring constantly while adding to prevent lumps. Boil for 5 min
6. Add cauliflower and broccoli - boil for 5 min
7. Add cheeses and taste for seasoning adjustments (more soup base, pepper, cheese etc. There is enough salt in the cheese and soup base that usually none is needed.)
8. Let stand for 5 min to slightly thicken before serving.


Source: A Jennie original

Tuesday, September 27, 2011

Parmesan Baked Chicken

I am not kidding when I say "Try This!" This is soo good! You can't stop eating it! AND, I don't know if you can see, but the bottom of the chicken breast is just as crusty as the top! Yum!

6 chicken breasts
1/2 tsp. salt
1/4 tsp pepper
4 Tbsp. butter, melted
2/3 c. toasted bread crumbs, (I like Italian)
1/3 c. grated Parmesan cheese
1/2 tsp. garlic powder
Kosher salt
pepper

Combine melted butter and garlic powder in pie plate. Mix crumbs and cheese in a pie plate.
Pound the chicken to about 1/2 " thickness. Brush chicken with garlic butter, then roll in bread crumb mixture. Place chicken in foil-lined baking dish/ cookie sheet.
(When baked on the foil-lined cookie sheet the bottom of the chicken crisps as well as the top! This is my favorite way to cook this.)
Drizzle with any remaining garlic butter. Sprinkle a small amount of Kosher salt over the chicken breasts. Bake at 400 degrees for 40-45 min or until chicken is done.

adapted from Terry Pate - Greenville Ward Cookbook

Monday, September 26, 2011

Carrot Cake Cinnamon Rolls

I love cinnamon rolls.  Like, REALLY love them.  When I saw the idea to use a cake mix as a base for a cinnamon roll, the wheels started turning.  I decided to experiment with a carrot cake mix I had in the pantry.  The results were better than I expected so I think I see some more experimentation going on in the near future....orange cake mix with orange cream cheese frosting, chocolate cake mix with cookies and cream frosting or chocolate frosting with a mint drizzle.  Hmmmm....probably didn't pick the best time to go on a diet.  Oh well, enjoy these yummy spirals of gooey goodness!!


Ingredients:
1 carrot cake mix (I used Betty Crocker)
2 1/2 cups warm water
4 1/2 tsp. yeast
1 tsp. salt
5-6 cups all-purpose flour
melted butter
cinnamon
sugar
raisins

1.  Combine cake mix, water, yeast, salt, and 2 cups of the flour.  Whisk until well blended.  Mix in remaining flour with wooden spoon until well combined.  The dough should not be super sticky, just a little bit sticky.  Let rise until doubled.
2.  Push the dough down and roll out into a large rectangle on a well-flour surface.  Spread melted butter evenly over the surface to within 1/2" of the edges.  Sprinkle with sugar, cinnamon, and raisins.
3.  Roll up dough.  Cut into 16 slices.  Place on greased sheet, cover, and let rise until doubled.
4.  Bake at 350 degrees for 20-23 minutes.  Frost while still warm.

Frosting Ingredients:
8 ounces cream cheese, softened
any leftover melted butter
1/2 tsp. vanilla
pinch of salt
pinch of cinnamon
about 4 cups powdered sugar
milk

1.  Cream the butter (if you have any left) and cream cheese until smooth.  Mix in vanilla, salt, and cinnamon.
2.  Add powdered sugar a cup at a time, thinning as you go with a few teaspons of milk until the frosting reaches the proper consistency.
3.  Scoop spoonfuls of frosting onto the pan of rolls and spread with an offset spatula.

Notes:

  • I eyeball the butter, sugar, cinnamon, and raisin amounts inside the rolls.  I spread the melted butter out a few tablespoons at a time and sprinkle enough sugar on top of that to kind of soak in the butter.
  • Cutting Tip:  Buy a container of plain ol' dental floss to cut the cinnamon rolls.  After you have rolled the dough up, take a long thread of the floss and scoot it under the roll at the halfway point. The floss will be perpendicular to the dough.  Take the ends, cross them, and pull.  Easy, and no more smushed rolls!
  • I like to add a touch of cinnamon to my frosting to tie in the flavors.
Source:  a Julie original 

Oven-Baked Sweet Potato Fries

I would eat these fries for breakfast, lunch and dinner if it was allowed. This is one of my all-time favorite foods! Don't get confused and buy yams. Though tasty, yams will get too mushy when cooked.

2 large sweet potatoes makes about 4 servings.

1. Wash the sweet potatoes, and preheat the oven to 450 degrees.

2. Using a very sharp chopping knife, julienne the potatoes into thin fries. Try to make them as uniform in thickness as you can, it will help with baking them evenly.

3. Place the fries in a microwave-safe bowl and submerge them in water. Cook for 5 minutes in the microwave. This will soften the potatoes up just a bit and speed up cooking time.

4. Dry the fries off on a paper towel and then place them on a baking sheet.

5. Drizzle the fries with vegetable or olive oil, and stir to coat evenly.
6. Season with salt and pepper.
OR for a sweeter version sprinkle with a cinnamon and brown sugar mix.
7. Bake at 450 degrees for 20 minutes, stirring once after 10 minutes.

Source: My own trial and error.

Saturday, September 24, 2011

Homemade Kettle Corn

I used to make this for movie night when I lived at home with my parents.  It's very easy to make and is ready in about 6 minutes! 

Ingredients:
1/4 cup oil (I've used vegetable and light olive oil.  Both work fine)
1/2 cup corn kernels
1/4 white sugar

1.  Have everything ready before you begin. Measure your corn and sugar and put into a bowl.  Pull out a large pot with a lid (I always use my 8 quart.  Do not use a dutch oven), two oven mitts, a wooden spoon, a large bowl to pour popped corn into, and salt.

2.  Pour your oil into your pot, add 3 corn kernels, cover, and heat over medium-high heat.

3.  Once the 3 kernels have popped, add the rest of your corn kernels and sugar.  Mix well and cover.
As soon as I put the lid on I rinse the sugar off my spoon.  It hardens quickly so I like to rinse it so I can use it later to mix the kettle corn with salt. 
4. After about 15-20 seconds, grip the handles of your pot and shake it.  Continue to shake your pot every 15-20 seconds until your kernels start popping.  Once they do, alternate between shaking and allowing pot to sit on burner a few moments.  When the popping slows down to 1 pop every few seconds, turn off the heat.  Give pot another shake, just for fun.
4.  Immediately pour kettle corn into your bowl and sprinkle with salt.  Stir, sprinkle more salt, then stir.

Enjoy!

*Please do not add extra sugar when making this.  After your kitchen fills with smoke and your pot is filled with burnt sugar...you will not like me anymore.  Just don't do it.

*This recipe takes practice to get the hang of when to shake your pot and when to let it sit.  Just listen to your kernels and judge by how quickly they're popping.

*After I've salted my kettle corn I like to fill my pot with soapy suds.  It makes clean up a breeze!

Source:  My memories...  Actually, I don't know.  Probably somewhere online.

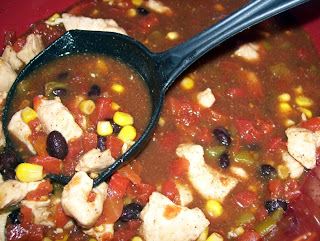
Mexican Chicken Stew


We once served this stew when we had the missionaries over for dinner. Apparently one of the elders liked it so much that he told another elder coming to our ward about it, and it has been requested!

Ingredients:
1 pound boneless skinless chicken breasts, cubed
1 T canola oil
2 cans (14 1/2 ounces each) diced tomatoes, undrained
2 C frozen corn
1 can (15 oz) black beans, rinsed and drained
1 can (14 1/2 oz) reduced-sodium chicken broth {I made my own in this amount}
1 can (4 oz) chopped green chilies {I used 2 cans of Old El Paso brand; I think their chilies are the best.}
2 T chili powder
1 T ground cumin {I used a bit less b/c I don't really like cumin)
1/2 t salt
1/4 t cayenne pepper
Whatever you might want to add to your individual serving(s), such as shredded cheese, sour cream, chopped green onions and/or cilantro, etc.

1. In a small skillet, brown chicken in oil.
2. Transfer chicken to a 5-quart slow cooker.
3. Stir in the remaining ingredients. {I just combined them all and then stirred.}
4. Cover and cook on low for 5-6 hours or until chicken is no longer pink.
5. Personalize your servings and enjoy!


Yields 6 servings.

Source: Renamed by me, recipe used was submitted to Taste of Home by Stephanie Rabbitt-Schappacher of West Chester, Ohio

Friday, September 23, 2011

Roast Chicken with Rosemary


I know this is a simple recipe, but I have many friends who are afraid of roasting chickens. Seriously - try it. You'll wonder what took you so long to try it. It is SO easy.

Ingredients:
- Roasting chicken
- Salt and Pepper to taste
- One whole onion
- Rosemary

1. First things first - rinse the chicken. If the chicken has all the "innards" take those out - you can either toss them or use the neck to cook into the gravy.
2. Season chicken with salt, pepper, and rosemary sprigs. Put onion in the cavity.
3. Place chicken in a roasting dish, or a casserole dish.
4. Cook chicken at 350 until juices run clear and the internal temp reaches 165. (about 20-25 minutes per pound)

Enjoy! Seriously, how simple is that? You'll feel like Miss Susie Homemaker when you pull out a beautiful chicken out of the oven.

Cheesy Potatoes

This dish was served at a Relief Society activity in my mom's ward several years ago. Although it was delicious as is, I have made a few changes in both ingredients and preparation. It can be a main dish (with ham) or a side dish (without ham).

1/2 stick (4 Tbsp) butter
1 can cream of chicken soup
1 pt light sour cream
Salt and pepper to taste
1/2 Tbsp onion powder
1 to 1 1/2 cup cubed ham (optional)
1/2 to 1 cup grated cheddar cheese
~2 lb. bag of frozen hash browns

1. Melt and mix the butter, soup and sour cream in a large pot over medium heat. Stir until smooth.


2. Add the ham (optional), cheese, onion powder, salt and pepper. Heat through, stirring often.


3. Stir in the hash browns until covered with the soup mixture.


4. Transfer to a 9x13 baking dish, coated with cooking spray.


5. Bake in the oven for 50 to 60 minutes.


[The original recipe called for southern-style hash browns, although I prefer to use the shredded. Use the longer cooking time for the southern-style potatoes; the shredded hash browns take less time to cook through.]

Source: Adapted from a family friend's recipe

Thursday, September 22, 2011

Thick Tomato Soup


This is a staple dish in our home. We eat it for lunch at least once a week and the kids scarf it right up (even Mr. Picky, aka: Ruffian1). Easy-peasy! Guaranteed Goodness!

8-12 oz Uncooked Pasta--we like SMALL shells or Elbow Macaroni
2 (10 oz) Cans Tomato Soup
1 Can ONLY Water
1/2 tsp Thyme
1 tsp Basil
1 tsp Oregano
1 (13 oz) Can Chicken Breast (you could cook a chicken breast and shred it, instead)
1 Cup Cheddar Cheese

1. In a Medium saucepan, cook Pasta according to package directions. Remove to strainer.
2. In the same pan (SAVE ON DISHES!), empty the tomato soup and add 1 can of water (remember, this is THICK soup. You can add more water if you like, but we don't.)
3. Stir in Thyme, Basil, and Oregano.
4. Shred the chicken with a fork and add it to the soup. Mix until everything is evenly incorporated.
5. Add cooked noodles and stir well.
6. Remove from heat and stir in cheese.


Mm-MMM!

Source: My family recipe box

~Kara

English Muffin French Toast


I have no idea which magazine this recipe came out of--Better Homes & Gardens?  Southern Living? Popular Mechanics?   Don't have the foggiest.  Didn't know I would need that information when I clipped it for my "Someday I Will Make This" folder.  So, if the 'owner' of this recipe ever reads this blog and recognizes this recipe--props to you sista!  I promise to never make this and call it my own.  You will always be a part of this dish...By the way, I put raspberries on mine because that is what I had in my pantry (Thrive product).  I would like it better with the suggested fruit toppings, I think.  They would be sweeter.  Just sayin'...


Ingredients:
4 large eggs
1 cup nonfat buttermilk
2 tsp. orange zest
1 tsp. vanilla extract
6 English muffins, split
   Vegetable cooking spray
1 cup fat-free Greek yogurt
2 Tbsp. maple syrup
   Toppings:  chopped fresh strawberries or nectarines.

1.  Whisk together first 4 ingredients in a bowl.  Place English muffins in a 13" x 9" baking dish, overlapping edges.  Pour egg mixture over muffins.  Cover and chill 8-12 hours.

2.  Remove muffins from remaining liquid, discarding liquid.

3.  Cook muffins, in batches, in a large skilllet coated with cooking spray over medium-high heat 2-3 minutes on each side or until golden.  Stir together yogurt and syrup until blended (I would add more syrup to your taste.  I did.); serve with the muffin French toast and toppings.


Source:  There really is one somewhere in a magazine.

Wednesday, September 21, 2011

Yellow Cupcakes

These cupcakes are compliments of Martha Stewart. I like this recipe because it's simple and I always have the ingredients on hand!

Ingredients:
1 1/2 cups all-purpose flour
1 1/2 teaspoons baking powder
1/2 teaspoon salt
3/4 cup sugar
1/2 cup (1 stick) unsalted butter, room temperature
2 large eggs
1/2 cup milk
1 teaspoon vanilla extract

1. Preheat oven to 350 degrees. Line the cups of a standard muffin pan with 12 cupcake liners.
2. Add flour, baking powder, salt and sugar in a large mixing bowl. Mix dry ingredients.
3. Combine milk and vanilla in a small bowl or measuring cup. Set aside.
4. With the mixer on medium speed, add softened butter one tablespoon at a time until incorporated in to the flour mixture.
5. Add eggs one at a time.
6. Add milk and vanilla and continue mixing for an additional 2 minutes.
7. Fill cupcake liners half full and bake 17-20 minutes.

*Keep a close watch on your cupcakes, especially if you are trying a new recipe for the first time. Oven temperatures vary! These cupcakes don't take longer than 18 minutes in my oven.

Source: MarthaStewart.com

Sugar-n-Spice Pumpkin Bread


This bread is delicious and one of our families' favorites. It works well as a muffin, freezes well (4-6 weeks max) and makes 5 medium loaves or two large regular loaves.

Ingredients:
4 eggs slightly beaten
3 cups sugar
1 cup vegetable oil
2 cups canned pumpkin
2 TBLS pumpkin pie spice
2 tsp baking soda
1 tsp salt
4 1/2 cups all purpose flour (whole wheat is yummy also)
2 cups chopped cranberries (optional)

Topping:
1/2 cup brown sugar
1 1/2 tsp cinnamon
2/3 cup finely chopped nuts (optional) pecans or walnuts work best

Mix ingredients together in small bowl with a fork - set aside.

1. Spray bread pans with non stick spray
2. Mix first 4 ingredients until blended
3. Stir in all dry ingredients plus cranberries if you are using them until well combined
4. Pour into greased pans
5. sprinkle Topping over bread
6. Bake at 350 for 40-50 minutes or until toothpick inserted in middle comes out "clean"
7. Remove bread from pans and cool on cooling rack

Source: Combined adaptation from my mom's recipe and "The Hows and Whys of the Year Supply"


Tuesday, September 20, 2011

Chicken Tortilla Soup

A very easy and delicious version of tortilla soup that can be made with food storage ingredients. Your kids will love helping with this one.  And guess what? 
 It has a hint of lime!  
Ingredients
2 cans (28oz or 3 1/2c) Chicken Broth
1/8c Taco Seasoning (or to taste)
A few shakes of garlic powder =)
Juice of 1 lime
2 chicken breasts, cooked and cubed*
1 can of corn with liquid
1 can of black beans, drained and rinsed
1 can of diced tomatoes with green chiles (Rotel offers Mild, Medium and Hot!) 
1 large avocado, peeled and diced
  1. Pour broth into soup pot, add taco seasoning, garlic powder and lime juice.  Stir until well blended.
  2. Add all other ingredients except avocado.  Bring to a boil, lower heat and simmer for 15 min or so.   
  3. Add avocado just before serving.  
  4. Serve with shredded cheddar cheese, sour cream and some crispy tortilla chips.  Mmmmm.  
Adapted from AllRecipes.com Six Can Chicken Tortilla Soup

*The original recipe calls for canned chicken, which works if you're going for a food storage friendly recipe.  But I would argue that it's much better with fresh or frozen chicken breasts.  =)  
*The amount of taco seasoning you add will add or decrease the spiciness of the soup, so if you like it spicy....bring it on!  
*ALSO...if you have Kids in the kitchen, they will love helping you empty the cans into the pot!  

Pumpkin Pie Shake

I love the fall season and all that comes with it. I especially love the fall food we make! Pumpkin pie spice is one of my favorite spices. So, I tweaked a recipe that I found for milkshakes and came up with the yummiest milkshake ever! The only downside to them is that they are highly addictive. I had one for breakfast this week.... Shh...don't tell. Hope you like them!


2 c vanilla ice cream
1 c milk
2/3 c canned pumpkin
1/4 c packed brown sugar
3/4 tsp. pumpkin-pie spice
3 Tbsp. frozen whipped topping, thawed

Combine first 5 ingredients in a blender, process until smooth. Pour 3/4 c ice cream mixture into each of 4 glasses. Top each with about 2 tsp. whipped topping; sprinkle with the addtional pumpkin-pie spice, if desired.


adapted from Cooking Light

Monday, September 19, 2011

No Bake Cookies


These are great for people who aren't a huge fan of peanut butter. They are so easy and it's nice not to have to heat your kitchen up with an oven in order to get a sweet treat sometimes! Children love to get in on the "dropping" step of making these.


2 cup sugar
1/2 cup fat-free milk
1/2 cup butter or margarine (I usually stick with butter)
3 cups quick-cooking oats
1 cup flaked coconut
6 tbs. baking cocoa
1/2 tsp. vanilla extract

1-In a saucepan combine the sugar, milk and butter.
2-Bring to a boil, stirring constantly.
3-Boil for 2 minutes. Remove from heat.
4-Stir in the oats, coconut, cocoa, and vanilla.
5-Drop by rounded spoonfuls onto waxed paper (I also use parchment paper if that's what I have on hand-it works fine).
6-Let stand until set.

*You can also freeze these.

Source: allrecipes.com

Bottoms-Up Cake

This is a fun and easy dessert to make.  It seems to defy reason!  But it's not just fun; it's seriously delicious too.

Ingredients:
1 cup flour
1/2 cup sugar
2 Tbsp. unsweetened cocoa
1 1/2 tsp. baking powder
1/2 tsp. salt
----
1/2 cup milk
1/4 cup vegetable oil
2 tsp. vanilla
----
1 cup sugar
1/4 cup unsweetened cocoa
1 1/2 cup boiling water

1.  Preheat oven to 350 degrees.  Mix first five ingredients together in medium bowl.
2.  Add in milk, oil, and vanilla and mix well.  Pour into UNgreased, flat 2-quart baking dish.
3.  Combine last three ingredients in small bowl.  Pour evenly over batter in the pan.
4.  Bake for 25-30 minutes.  Test only as deep as the cake with a toothpick.  The whole thing will wiggle since the cake is basically sitting on a bed of yummy chocolate sauce now.  Cool for 30 minutes.  Serve with whipped cream.

Source:  my recipe box

Pizza Casserole


Most people would define their dutch oven as something they stub their toe on while cleaning the garage, but in our house, it's a kitchen staple. We cook in it so often I sometimes forget I live in 2011. Wether you use a dutch oven, or a glass casserole dish, this simple casserole is sure to satisfy! (This is especially true if you really ARE camping and using your dutch oven. Just remember the charcoal!)


Ingredients:
1 pkg. Jumbo shell pasta
1- 1 1/2 jars pasta sauce
1 Kielbasa sausage
1 pkg. pepperoni
1 C. Mozzarella cheese, shredded

Directions:
1. Cook pasta shells as directed on the package.
2. Preheat the oven to 350 degrees. (If using a dutch oven, preheat it in the oven as well)
3. Slice the kielbasa into 1/4 inch slices.
4. Mix all the ingredients in the casserole dish or dutch oven. Cover with foil or lid.
5. Bake at 350 degrees for 30 minutes.

Source: Family

Saturday, September 17, 2011

Balsamic Potatoes and Onions

Everytime I've roasted potatoes (or any other vegetable) I've kept it very simple: olive oil, sea salt and fresh ground pepper.  While that combination never fails, this is a fantastic alternative if you're wanting to try something different.  I made these for the first time this week and they were FABulous!  I did make a few changes, though, and will list them at the bottom.  Also, this dish takes 2 hours to bake.  I know that sounds long, but the end result is totally worth it!

Serves: 4

Ingredients:
12 small red potatoes
8 small whole onions
2 tablespoons butter
4 tablespoons balsamic vinegar
1 teaspoon fresh thyme leaves
sea salt and fresh ground pepper

1.  Preheat oven to 375 degrees.
2.  Wash potaoes thouroughly, but do not remove skin.
3.  Clean and peels onions, but leave whole.
4.  Place potatoes and onions in a roasting or deep dish pan.
5.  Sprinkle vinegar over vegetables.
6.  Dot with butter and sprinkle thyme leaves on top.
7.  Season liberally with sea salt and fresh ground pepper.
8.  Cover baking dish tightly with foil and bake for 2 hours, stirring every half hour.
*I did not have small red potatoes or small onions on hand.  I quartered 5 medium-large Yukon potatoes and 1 1/2 large onions.
*I added a little extra balsamic and butter.  I wanted a nice glaze on my veggies!
*During the last hour of baking I left the foil off.  If your onions or glaze start to burn, turn down the oven temperature.

Source:  Food.com recipe

Hearty Italian Sausage & Spinach Soup


To quote my husband, "I don't want this to go to your head or anything, but this is so good, I don't even want to eat it with crackers." Hahaha! And even my 19-month-old liked it. He picked out the sausage (and ate it), dipped crackers in the soup, then sucked the soup off the cracker.

Ingredients:
4 Italian sausages or 1 pkg ground Italian sausage
2 cans (14 oz each) reduced-sodium chicken broth
3/4 C chopped onion (or dehydrated onion)
2 garlic cloves
olive oil (I used EVOO)
1 14.5 oz can diced tomatoes, undrained
1 10-oz. package frozen chopped spinach, thawed and well drained (Or you can use frozen bagged chopped spinach like me--then you don't have to drain it. The bags are usually 16 oz. instead of 10 but I still use the whole thing and add water to the soup if needed.)
1 1/2 t dried oregano leaves
1/2 t salt (varies according to the amount of sodium in your broth)
1/4 t ground black pepper
1/4 t dried basil

1. Gather all your ingredients so that the spinach can begin to thaw while you form the Italian sausage into balls. Remove sausage from casing and form into balls about the size of a nickel (or whatever size you'd prefer). If you're using ground Italian sausage, begin browning it over medium heat.
2. Start your chicken broth if you're using bullion. (I like to add 28 oz. of water and then 2 packets of Herb-Ox chicken bullion powder. I think these packets have great flavor and they're sodium free.)
3. Chop the onion and garlic.
4. Cook and stir onion and garlic in hot oil in Dutch oven or large stock-pot on med-high heat for 3-5 minutes or until onion is tender. (If using dehydrated onion, wait to add until after broth.)
5. Add broth, tomatoes with their liquid, spinach, oregano, salt, pepper, and basil; bring to a boil.
6. Add sausage.
7. Reduce heat to low; cover.
8. Simmer until sausage is cooked through, about 15 minutes. Makes 4-6 servings.

Source: Adapted from "Hearty Meatball Spinach Soup" recipe found on the back of an old Premium crackers box; that recipe can be found here.

Friday, September 16, 2011

Homemade Butterfingers

It's not my normal recipe posting day, but I just had to go ahead and share this for two reasons.  One, it involves an ingredient that is going to be more prevalent right now and will, after Halloween, be on super sale.  Two, I seem to have an obsession with peanut butter and chocolate.  Butterfinger is one of my favorite candy bars, so when I saw this recipe floating around Pinterest, I had to give it a try.  I was skeptical because, really...three ingredients?  But one bite and I was forced to exclaim (exclaim, people!) "Oh my gosh, it tastes just like it!"  I hope you enjoy it.  I'll be stocking up on some cheap candy corn this season!


Ingredients:
1 lb. candy corn*
1 lb. creamy peanut butter
1 lb. chocolate candy coating**

1.  Prepare an 8"x8" pan with a light coat of cooking spray.  Lay parchment paper or wax paper in the pan so that it covers the bottom of the pan, leaving the ends hanging over two edges.  (You will use these "handles" to lift out the bars, making it easier to cut them and set them out for chocolate coating.)  
2.  Lightly coat a glass mixing bowl with cooking spray.   Place the candy corn in the bowl and microwave in 30 second increments, stirring in between, until the candy corn is melted.  Stir in the peanut butter and continue to stir until the mixture is smooth.  Pour this mixture into your prepared pan and spread evenly.  Chill until set.
3.  Remove the bars by lifting the parchment paper "handles" and place on a cutting board.  Cut into bars.  Place a piece of wax paper on a cookie sheet and set a wire rack over it.  Set bars one inch apart onto the wire rack.
4.  Melt the chocolate candy coating according to the directions.  Using a small spoon, pour chocolate on top of a bar along its length; then using an small offset spatula or a butter knife and spread the chocolate flat along the top.  The chocolate will ooze down the sides, so use the knife to spread the chocolate along the sides of the bars.  Allow to set, or place in fridge to set.

Note:
*The first time I made these I used the only candy corn I could find at Walmart, but it's technically Indian Corn.  It's the one with brown instead of yellow, and it DOES have a different flavor.  The final product was good but did not taste very much like Butterfinger and did not have that bright orange color.  So DON'T use anything but the traditional candy corn.  Also, the recipe calls for a pound, but I found it in 14 ounce bags.  That worked fine.
**You can find this in the baking aisle at the grocery store.  It usually comes in a flat package that has a tray inside that can be used as its own microwave container.  I was able to use it for 2 batches because I didn't dip the entire bar in it, like the original recipe stated.


Source:  It's on multiple sites and blogs, but I got it from Plain Chicken

Cafe Rio Goodness: Cilantro Ranch Dressing


Hooray! Here's your last installment for Cafe Rio's AMAZING salad! So far I've shared the Pork Barbacoa, Cilantro Lime Rice, and Black Beans. Today I'm sharing their wonderful Creamy Cilantro Ranch Dressing. It is so good. You will not need any sour cream on this salad. This dressing does the trick. 

Cilantro Ranch Dressing

1 packet TRADITIONAL Hidden Valley Ranch mix (not BUTTERMILK)
1 c. mayonnaise
1 c. buttermilk
2 tomatillos, remove husk, diced
1/2 bunch of fresh cilantro
1 clove garlic
juice of 1 lime
1 jalapeno, seeds removed

Mix all ingredients together in the blender. That's it!


So, now that you have all the recipes needed. Let's talk about assembling this salad. You're going to need a big plate. :-) First, lay out a big flour tortilla that's been warmed. Then add the pork, then the rice, then the beans. Throw a handful of romaine salad on top. Next, you'll see tortilla strips - I can find these in the produce section close to the salads and croutons. THEN top with this amazing dressing.

I assure you this will become a favorite in your house. It is in mine!!

Broiled Tomatoes with Feta

I love that window of time in the summer when tomatoes are in season. It's the best time of year for BLTs, fresh salads and these broiled tomatoes.


Ingredients:
6 Roma tomatoes
0.7 oz. Italian seasoning packet (used to make dressings or marinades)*
2/3 cup crumbled Feta cheese


1. Cut tomatoes in half lengthwise and place, cut sides up, on a baking sheet lined with aluminum foil.
2. Sprinkle each tomato half with Italian seasoning and feta.
3. Broil 3 inches from heat 2 to 3 minutes or just until cheese starts to brown. [If you're like me and forget to move the oven rack up until you've already preheated the oven, you can broil them at for an extra minute or two with the same results.]

*If you choose to use Italian seasoning in a spice bottle, you'll need to also sprinkle on salt and pepper; if you choose the dressing/ marinade powder it already has salt and pepper in it.

Source: Southern Living (magazine)

Cucumber Dressing (over Fresh Tomatoes)

One of the things I love best about summer is the fresh produce, especially fresh tomatoes. Roma are my favorite for just about everything except sandwiches. In honor of these delectable divas, I'm sharing two of my favorite 'tomato' recipes with you today.

2 cucumbers, washed and cut into thirds or fourths
2 Tbsp dry onion soup mix*
1 cup lite mayonnaise
2 tsp lemon juice
Salt and pepper, to taste
Fresh tomatoes, sliced or cut into large chunks


1. In a blender or food processor, shred the unpeeled cucumbers.

2. Mix with onion soup mix, mayo and lemon juice.

3. Refrigerate for at least two hours (for best taste, allow it to mesh overnight).

4. Serve over fresh tomatoes.


*This is a very mild dressing. If you prefer a stronger flavor (as my husband does), use the whole (~4 Tbsp) packet of dry onion mix and increase the amount of salt and pepper.

Adapted from Southern Living

Thursday, September 15, 2011

Grandma's Swedish Pancakes


When I say "Grandma's," I mean MY grandma. We used to go to her house almost every week for Sunday dinner. It was common knowledge that we had a big lunch and "no dinner." By "no dinner" I mean we had a big dessert. I attribute my sweet tooth to Grandma (and my mom. Yep, it's totally genetic!)!

Swedish Pancakes were often on the "no dinner" menu. They are essentially Crepes, and though there are many various ways to eat them, the following way is the best. Trust me.

6 eggs
2 1/2 Cups Milk
1 1/2 Cups Flour
2 Tbsp Sugar
1 tsp Salt

1. Turn on your griddle to 350 F. A frying pan works, too--medium heat.
2. In a Medium bowl, beat your eggs until thick and foamy.
3. Stir in your milk.
4. Sift together dry ingredients (or if you're naughty like me, don't...) and add them to the egg mixture.
5. Beat until smooth.

This is where it may get a little tricky...

6. Making sure your griddle is nice and hot, spray it with Cooking Spray (don't forget!!).
7. Using a Ladle, cover your griddle in a thin layer of batter (apx 3 ladles-full).

8. Wait until the batter looks a little dry, then use the corner of your Spatula and "cut" the pancake width-wise on the griddle into 4 rectangles (Sorry there's no picture of this. My hands were tied and I don't trust the Ruffians with the camera yet.).
9. Flip the rectangles over and butter them while the other side is cooking--I don't time it, but by the time I'm done buttering the last rectangle, they're done.
10. Don't worry if you have a few that turn out like this:
Just butter them, or lather them with jam or syrup and eat 'em anyway! OR if you're mad at it, THROW. IT. AWAY! That'll teach it! And it may make you feel better. (NOT that I would know about this from experience...)

11. Take the pancakes off the griddle and pile them on a plate. Repeat Steps 6 - 11 till all the batter is gone.
12. Take a sugar shaker***, if you have one--if not, your hand and a spoon will do just as well!--and shake a GENEROUS amount of sugar onto the buttery side, coating the entire thing. When I say "generous" I mean, GENEROUS. You should SEE the sugar! After you've done it a few times, you'll know how you like it and can do it your way.

13. Starting at a short end, roll one rectangle to the other end. Repeat steps 12 and 13 till all your pancakes are rolled up.

Now you can eat away! Your hands will be a little sticky, your tummies will feel full, and if you're like my Ruffians, your faces should look like this:
Ruffian3 smiling as he takes a bite. Ruffian2 likes to unroll hers. She always did like a mess!


Makes about 16.

***You really can use a variety of fillings. We've done jam, peanut butter and syrup, fruit and whipped cream, and Nutella--all VERY GOOD!

Source: Grandma Taylor, one of the greatest women alive!

~Kara